And where to get such a safety vest? That’s right – sew your own hands! Moreover, it is quite easy. All you need is the desire and a meter of suitable fabric. It should be easy to care, a little creased, resistant to dirt and wear-resistant. The vest should protect clothing from possible stains, for example, when changing wheels.
For this, thin denim and cotton fabrics of any color are well suited. The main thing – not orange, not to be like a road worker.
If you do not have a car, then this vest can be seen as a gift to a fisherman, a mushroom picker, a hunter, just add more pockets and not to sew reflective tapes. It will turn out a convenient and multifunctional thing.
To sew a reflective vest, take as a basis the pattern of a men’s jacket model 122B from Burda 12/2017:
Men’s jacket could be better for a walk in the fresh air than a fur-tweed jacket insulated with fur! Details such as a button closure, pockets with flaps in the seam of the front yoke, a belt, and hemline at the bottom edge, we borrowed from a denim jacket.165 in the basket Move all the details of the model into the tracing paper, except the sleeves and the collar. It is better to remove the pattern on the size more so that the vest can be put on a winter jacket! For the same, you can cut deeper armhole.
You will need: fabric for the jacket 1 m; reflective tape 4 m; oblique backing cotton, not narrow, it is better to take it wider or carve itself 3 m; fastener buttons 5 pieces or Velcro tape 20 cm; thread; pins, needle, chalk, ruler; scissors.
Step 1 Remove the pattern and connect the yoke with the shelf and back.
We put the patterns of the shelves and backs on a piece of tracing paper so that the armhole becomes intact. Paste them. We will make the vest straight and without side seams.
Then we increase the length by 10-15 cm. It is possible and more, depending on how tall your man is. To the edge of the board add a double bar 3 + 3 cm.
We draw the flange neck diagonally from shoulder to yoke.
Turn the slats on the shelf.
And only now we cut off the neck and turn the bar away. Its top will be serrated, so it will be necessary to cut it.
Draw the location of the tape.
Draw the location of the pocket. I decided to make a pocket with a flap and put the flap under the ribbon to sew them with one line.
Make a pocket with a 4 cm trim on top. The flap will be folded down, so in a cut, it will be 16×12 cm. We will cut out the flap and pocket in 2 parts.
Step 2 We fold the fabric in half, put them back on the fold of the fabric.
Cut out a vest with allowances of 1.5 cm overall cuts, bottom – 4 cm. Do not allow allowances along the slats! Cut the fabric right along the edge of the plank! The pocket and valve allowance 1 cm.
Step 3. Harvesting Pockets and Valves
Since the fabric does not stretch and dense, I did not glue the piping and valves. In thin and soft fabric they can be strengthened with glue. We do not glue the bar, because the second bend of the bar replaces the glue one. Unscrew the facing of the pocket on the wrong side, and unscrew the 1 cm allowance on the facing and pin. The valve folded in half chipped along the sides.
To the pockets and valves were the same size, you need to put them under the foot of the machine one by one and sew one line. Pocket immediately we spend on the contour.
We cut the allowances at the folds diagonally, the valve allowances up to 7 mm.
We unscrew the facing of the pocket on the inside and pin it, the valves are turned out.
We iron the valves and allowances of the pocket, having turned them along the line on the wrong side. Valves stopping by 7 mm, in the pocket nastrachivaem, facing.
Step 4 Fold the vest in one layer, put pockets on the markup, valves are on top of them, cover the valve with tape. Lay out the tape on the markup. All the details are pinned, we check the symmetry.
Attention!
Reflective fabric on one side is darker. That’s it, and it reflects the light. In order not to confuse, you can take a picture of the tape on both sides. With a flash, you can see which side is lit. We put it on top.
Step 5 Adjust the contour pockets by unscrewing the flaps. Then stitch the tape with valves, then stitch the rest of the tape 1 mm from the edge on both sides.
I under 45 degrees ironed the fold of the cotton fabric.
Then she slashed strips of oblique bakes from a bend of 3 cm. And so all the bands: I doubled – cut.
Step 7 Edge shoulder seams. You can sweep them.
Step 8 We prick the oblique backing from the face of the jacket on the armholes so that the cuts of the bake and the cuts of the armholes match.
Stitch the backing on the allowances of 1 cm from the bend.
The allowances are notched in curves and trimmed to 7 mm.
Unscrew the oblique inlay on the allowances and scribble 1 mm from the seam of the inlaying the inlay.
Step 9 Stitch the shoulders and the slanting tape in one line. Trim the ends of the bake. Allowances to iron out.
Step 10 Unscrew the bake on the inside of the armhole with the transition edging, to mark and iron.
Stitch a tape on 1 mm from its edge on armholes.
Step 11 Press the inside out of the vest by twisting it 2 times.
Unscrew the trims on the front side along the edge of the side and pin the oblique ends of the strip to the neck.
Step 12 Prick and scoop a slanting inlay on the neck. The ends of the bake should overlap the bar. The rounding allowances are notched and cut to 7 mm.
Trim and unscrew the ends of the slats. Bakey unscrews and scribbles on allowances. Unscrew the backing on the wrong side. Basting and stitch on the neck as well as in the armholes.
Step 13 Compare the lengths of the shelves. Unscrew the slats at the bottom on the face of the vest and set it 3 cm from the bottom. Trim the ends of the plank, unscrew it.
Stitch slats on shelves.
Step 14 Turn the bottom of the vest up to 1 and 3 cm, iron, pin and stitch to the bottom of the vest.
How to sew a men’s shirt: master class
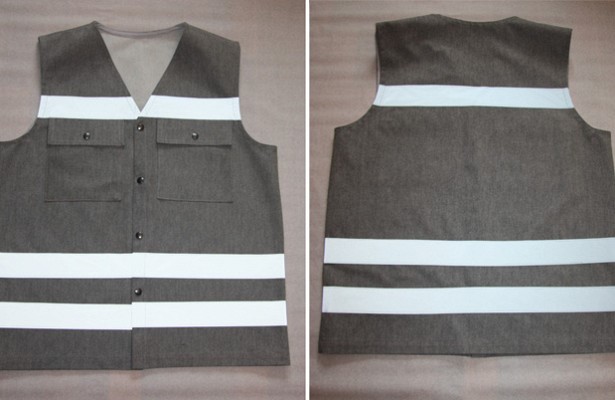
Step 15 Lay out the fastener. Put the buttons or sew Velcro tape so that the hooks are on the inner side of the plank (right), and the loops on the front side of the left shelf.
Done!